
What Are the Most Common 3D Printing Mesh Errors?
Last Updated: October 29, 2026
Quick Summary
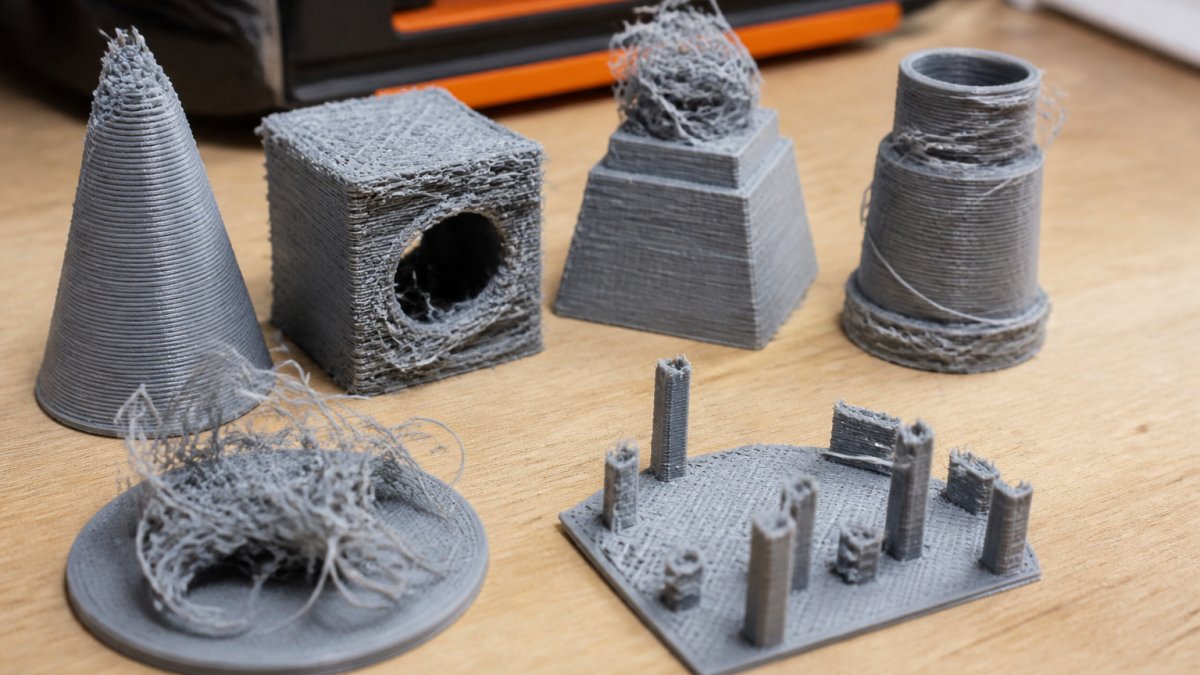
The most common 3d printing mesh errors are holes, flipped or inverted normals, self-intersecting faces, and non-manifold edges. A slicer reads these defects as ambiguous geometry and guesses, producing gaps, blobs, and failed layers. Fix them in software by running an automated repair pass first, then manual cleanup in Blender or Meshmixer.
- Non-manifold geometry is any edge shared by more than two faces, or any face with zero thickness.
- In Blender, recalculate inverted normals with Mesh > Normals > Recalculate Outside in Edit Mode.
- Microsoft 3D Builder fixes most basic errors in under a minute with its one-click Repair button.
- Run the automated repair first, then compare the repaired model against the original in the slicer preview.
- If a defect repeats in the same spot on every print, suspect the mesh rather than the machine.
Table of Contents
- Why 3D Printing Mesh Errors Break Prints Before They Start
- How to Fix Non-Manifold Geometry in Your STL File
- What Are Inverted Normals in 3D Printing and How Do You Correct Them?
- Holes, Self-Intersections, and Other Mesh Integrity Failures
- Best Free Mesh Repair Software for Common STL Errors
- Physical Print Defects That Look Like Mesh Errors (But Aren't)
- Upload Your STL File for an Instant Quote
- Frequently Asked Questions
Why 3D Printing Mesh Errors Break Prints Before They Start
Most failed prints never had a chance. The model was broken before the file reached the slicer, and no amount of bed leveling or temperature tuning will save it.
Common 3D printing mesh errors are defects in the digital model, not the machine: holes, flipped normals, self-intersecting faces, and non-manifold edges.
The fix happens in software, not on the print bed.
How to Fix Non-Manifold Geometry in Your STL File
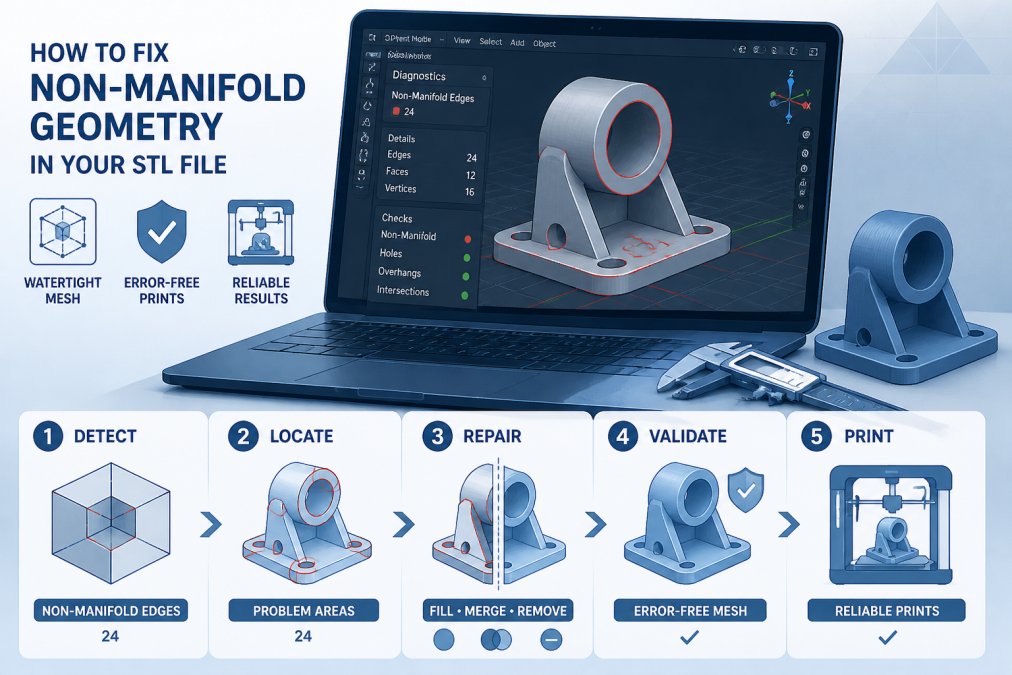
Non-manifold geometry is any edge shared by more than two faces, or any face with zero thickness. A manifold, watertight model has every edge shared by exactly two faces. When that rule breaks, the slicer cannot tell inside from outside.
Non-manifold errors show up in a few predictable ways:
- Interior faces buried inside the model
- Faces that meet at a single shared edge, like two boxes touching
- Zero-thickness walls where surfaces overlap
The repair approach depends on the tool. Automated repair closes gaps for you; manual repair gives you control when geometry is complex or the auto-fix mangles detail.
Step-by-Step: Repairing Non-Manifold Edges in Blender and Meshmixer
In Blender:
- Install the 3D Print Toolbox add-on from Preferences.
- Open the sidebar and run "Check All" to flag non-manifold edges.
- Switch to Edit Mode and select non-manifold edges with Select > All by Trait.
- Use Merge by Distance to weld duplicate vertices.
- Delete interior faces manually, then fill holes with the Fill tool.
- Re-run the check until zero errors remain.
In Meshmixer:
- Import the STL and open Analysis > Inspector.
- Blue spheres mark holes, pink marks self-intersections.
- Click "Auto Repair All" for a fast pass, or fix each marker by hand.
- Run Edit > Make Solid to rebuild a clean watertight shell.
- Export as STL and re-check in your slicer.
For a deeper walkthrough on preparing files correctly before printing, see our guide on how to prepare STL files for 3D printing.
What Are Inverted Normals in 3D Printing and How Do You Correct Them?
Inverted normals are faces whose direction points inward instead of outward. Normals tell the slicer which side of a surface is solid and which is air.
The symptom is unmistakable: your model slices with missing walls, hollow shells, or surfaces that vanish in the preview.
Fixing inverted normals is usually fast:
- Blender: Select all faces in Edit Mode, then Mesh > Normals > Recalculate Outside.
- Meshmixer: Edit > Flip Normals, or let Make Solid rebuild them.
- Microsoft 3D Builder: The automatic Repair function corrects most normal issues on import.
Watch out: recalculating normals on a model with interior geometry can flip the wrong faces.
Holes, Self-Intersections, and Other Mesh Integrity Failures
Mesh integrity covers every defect that makes a model ambiguous to a slicer. Holes are missing faces that leave the surface open; self-intersections happen when faces pass through each other, creating overlapping geometry the slicer cannot resolve. A watertight model has neither, and that is the standard every STL should meet before slicing.
What separates a clean file from a broken one is not the number of defects but whether the slicer can determine a single, unambiguous inside and outside. Each integrity failure breaks that determination differently:
- Holes leave the surface open, so the slicer has to guess where the shell closes. Small holes often print as a thin skin or a gap; large holes can make the slicer drop the surrounding wall entirely.
- Self-intersections create overlapping volumes. The slicer may union them, subtract one from the other, or produce internal walls that never get printed, depending on the tool and the slicer's union mode.
- Duplicate faces stacked on top of each other confuse the slicer's inside/outside test and often show up as z-fighting artifacts in the preview.
How to Detect Each Integrity Failure Before Slicing
The fastest detection pass is your slicer's own import check. PrusaSlicer, OrcaSlicer, and Simplify3D all flag integrity problems on import and offer a repair step. Cura's Mesh Tools plugin adds a similar check.
For a deeper check, run the model through a dedicated inspection tool:
- Blender 3D Print Toolbox: reports non-manifold edges, zero-area faces, and thin walls in one panel. It is the most thorough free check for self-intersections because it evaluates face-to-face intersections directly.
- Meshmixer Inspector: color-codes holes (blue), self-intersections (pink), and small disconnected components, and lets you jump to each marker.
- Microsoft 3D Builder: its repair pass is fast and catches most holes and flipped normals, but it does not report self-intersections explicitly, so treat a clean result there as a first pass, not a final check.
A practical workflow is to run the slicer check first, then the Blender 3D Print Toolbox check, then a visual pass in the slicer preview. If all three agree the model is clean, it usually is.
How to Repair Each Integrity Failure
Repair strategy depends on the defect type, not on the tool:
- Holes: fill them with the smallest surface that matches the surrounding curvature. In Blender, select the boundary edge loop and use Mesh > Fill, then check the new faces against the original surface. In Meshmixer, use Inspector and click each blue marker to fill it individually rather than running Auto Repair All, which can bridge across features you needed.
- Self-intersections: the reliable fix is to rebuild the shell. Meshmixer's Edit > Make Solid rebuilds a watertight shell from the existing surface, and Blender's Remesh modifier does the same at a chosen voxel size. Both approaches trade fine detail for a clean manifold, so compare the result against the original before printing.
- Duplicate and degenerate faces: in Blender, select all faces in Edit Mode, then Mesh > Clean Up > Merge by Distance to weld duplicate vertices, and Mesh > Clean Up > Degenerate Dissolve to remove zero-area faces. Re-run the 3D Print Toolbox check afterward.
For severe corruption, Autodesk Netfabb handles geometry that simpler tools give up on, including self-intersecting lattices and models with thousands of tiny holes. It is the escalation step, not the first stop.
Best Free Mesh Repair Software for Common STL Errors
Free tools handle the vast majority of common 3D printing mesh errors. You do not need an expensive license to fix a hole or a flipped normal.
Here is how the free options compare:
| Tool | Platform | Best For | Automated Repair |
|---|---|---|---|
| Microsoft 3D Builder | Windows | Beginners, quick fixes | Yes, one-click |
| Meshmixer | Windows, Mac | Targeted hole filling | Yes, Inspector tool |
| Blender | Windows, Mac, Linux | Manual geometry cleanup | Partial, via add-on |
| PrusaSlicer | Windows, Mac, Linux | Repair during slicing | Yes, Netfabb integration |
| MakePrintable | Browser | Cloud-based workflow | Yes, fully automated |
| Tinkercad | Browser | Simple model edits | Limited |
Microsoft 3D Builder is the fastest starting point. Import the STL, click Repair, and export. It fixes most basic errors in under a minute. Meshmixer gives you more control when the auto-fix misses something.
Upload your STL file for an instant quote →
Software-Specific Repair Workflows: A Step-by-Step Walkthrough
Most guides stop at the tool list.
Microsoft 3D Builder (fastest first pass)
- Open the STL. If the model has errors, a red banner appears at the bottom of the screen with a Repair button.
- Click Repair and wait for the progress bar to finish. The tool rebuilds the shell and corrects normals in one pass.
- Save As a new STL rather than overwriting the original, so you can compare.
- Re-import the saved file and confirm the red banner is gone before slicing.
This pass fixes holes and flipped normals reliably. It does not report self-intersections, so follow it with a Blender check if the model is complex.
Meshmixer (targeted hole filling)
- Import the STL and open Analysis > Inspector.
- Blue spheres mark holes, pink marks self-intersections, and small red spheres mark disconnected components.
- Click each marker to jump to it. For a hole, click the marker and Meshmixer fills it with a patch that follows the surrounding curvature.
- For a self-intersection, do not click Auto Repair All. Instead, note the location and plan a Make Solid rebuild, because auto-repair on an intersection often produces a worse shell.
- Run Edit > Make Solid with a voxel size small enough to preserve detail. A smaller voxel size preserves more detail but produces a larger file and takes longer; start at a size that keeps the smallest feature you need.
- Export as STL and re-check in your slicer.
Blender (manual geometry cleanup)
- Install the 3D Print Toolbox add-on from Preferences > Add-ons.
- Open the sidebar (N panel) and run Check All. The panel reports non-manifold edges, zero-area faces, and thin walls.
- Switch to Edit Mode and use Select > All by Trait > Non Manifold to highlight problem edges.
- Use Mesh > Merge by Distance to weld duplicate vertices, then Mesh > Clean Up > Degenerate Dissolve to remove zero-area faces.
- Delete interior faces manually, then fill holes with Mesh > Fill.
- Recalculate normals with Mesh > Normals > Recalculate Outside.
- Re-run Check All until zero errors remain, then export as STL.
Blender is the slowest path but the only one that gives you full control over complex interior geometry.
PrusaSlicer (repair during slicing)
- Drag the STL into PrusaSlicer. If the model has errors, a warning appears in the lower-right notification area.
- Open the notification and choose Fix by Netfabb. PrusaSlicer runs the repair in the background and replaces the model with the repaired version.
- Check the preview layer by layer before exporting G-code, because the Netfabb pass can change thin features.
This is the fastest path when you are already slicing and do not want to leave the tool.
Automated vs. Manual Mesh Repair: Which Workflow Fits Your File
Automated repair runs an algorithm that closes holes and rebuilds surfaces. It is fast and works well on simple defects. Manual repair means you select and fix each error yourself.
Choose automated when:
- The model has a handful of small holes
- You need a fast turnaround
- The geometry is organic or sculpted
Choose manual when:
- Auto-repair collapses fine detail
- The model has complex interior structures
- You need tight tolerances for a functional prototype
A common mistake is trusting auto-repair blindly. It can close a hole by bridging across a feature you needed, silently changing your part. The practical rule is to run the automated pass first, compare the repaired model against the original in the slicer preview, and only escalate to manual editing when the automated result changes geometry you care about.
Physical Print Defects That Look Like Mesh Errors (But Aren't)
Not every bad print starts with a bad file.
Stringing and oozing are retraction problems, not geometry problems.
Layer shifting comes from a loose belt, a slipping pulley, or the nozzle catching on a curled edge.
Under-extrusion and over-extrusion trace back to print temperature, filament diameter, or a partially clogged nozzle.
Our diagnostic guide on why 3D printing prototypes fail walks through the physical side in detail.
Upload Your STL File for an Instant Quote
You have fixed the mesh. Now the file needs to become a real part, and that is where we come in.
Our Bambu Lab multi-color 3D printing and xTool UV and MOPA laser engraving are available for branded parts and displays. Upload your STL file for an instant quote, and pricing depends on quantity, dates, and delivery.
We support projects of any complexity. Ready to move from repair to production? Upload your file for a real-time quote and see what your part costs to print. You can also review our full range of services to match the right process to your project.
Frequently Asked Questions
What are the most common mesh errors in STL files?
The most frequent 3D printing mesh errors are non-manifold geometry (edges shared by more than two faces), holes in the surface, inverted normals, self-intersecting faces, and zero-thickness walls. Each one can cause a slicer to misread the model's interior and exterior, leading to missing layers, hollow shells, or failed toolpaths. Most repair tools detect these automatically on import, so running a quick integrity check before slicing catches the majority of problems.
Why does my slicer report a mesh error even if the model looks correct?
A model can look perfectly solid on screen while still containing tiny gaps, duplicate vertices, or faces flipped inward. Viewers render surfaces visually, but slicers need a watertight volume to calculate walls and infill. A single unclosed edge is enough to trigger a warning. Load the file into a repair tool, run an integrity check, and re-export the STL before slicing again.
How do non-manifold edges affect 3D print quality?
Non-manifold edges leave the slicer unable to decide which side of a surface is solid, so it may skip walls, fill voids incorrectly, or generate erratic toolpaths. In practice this shows up as missing sections, unexpected holes in the finished part, or a print that stops extruding mid-layer. Repairing the geometry so each edge connects exactly two faces restores a clean, watertight model that slices predictably.
Which free software is best for repairing 3D printing mesh errors?
Microsoft 3D Builder handles basic hole filling and non-manifold repair with one click and suits beginners. Meshmixer's Inspector tool gives more control over individual defects, while Blender's 3D Print Toolbox checks wall thickness and overhangs alongside manual cleanup. PrusaSlicer also repairs meshes automatically on import through its Netfabb integration. Start with the simplest tool that resolves the error, and move to manual editing only when automated repair fails.
Broken meshes stall more projects than bad printers ever will. If you would rather hand off the file and get a finished part, Alex 3D Print Us LLC is built for exactly that: multi-color 3D printing, UV and laser engraving, fast turnaround, and a quote the moment you upload. Get started with Alex 3D Print Us LLC and turn your repaired STL into a part you can hold.
