
Why 3D Printing Prototypes Fail: A Diagnostic Guide
Table of Contents
- Why 3D Printing Prototypes Fail: The Core Causes
- Build-Plate Adhesion and First-Layer Problems
- Bed Leveling, Z-Offset, and Calibration Failures
- Extrusion Issues: Over-Extrusion, Under-Extrusion, and Nozzle Problems
- 3D Printing Troubleshooting: Temperature, Speed, and Material Condition
- STL File Errors for 3D Printing and Slicer Misconfiguration
- A Structured Diagnostic Workflow for Prototype Failures
- 3D Print Warping, Deformation, and Design-Induced Failure
- 3D Printing Material Selection for Prototypes: Strength and Durability
- Frequently Asked Questions
Last Updated: October 17, 2026
Why 3D Printing Prototypes Fail: The Core Causes
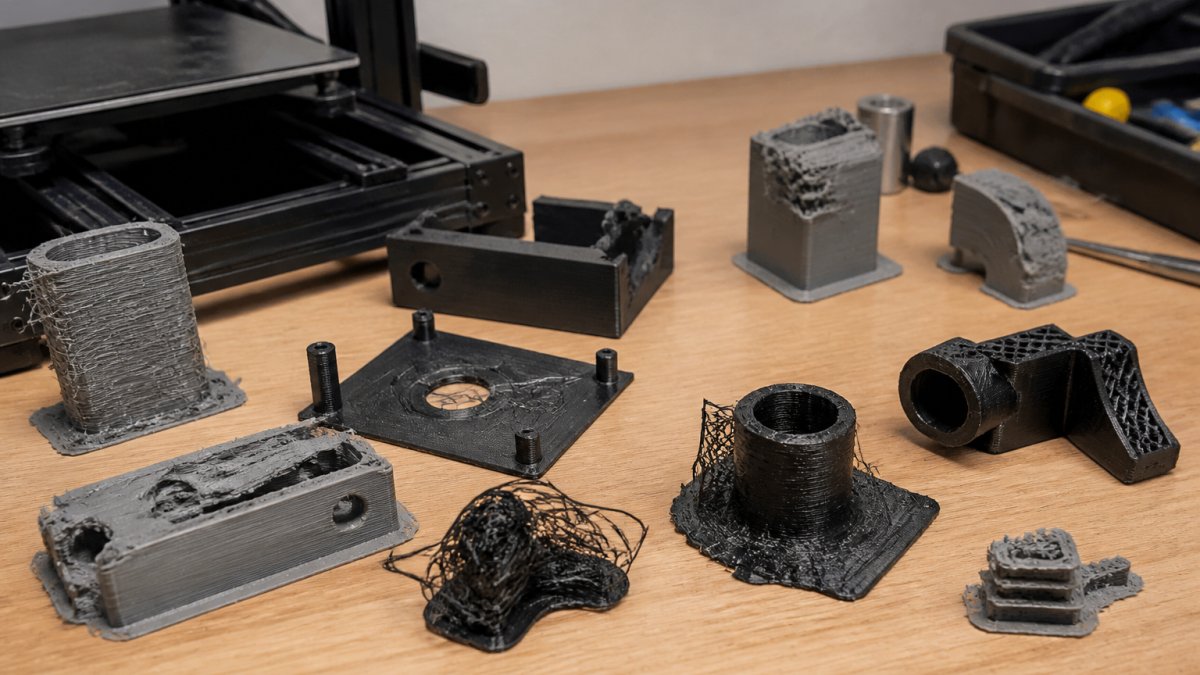
Why 3D printing prototypes fail comes down to a handful of interconnected issues that most teams don't diagnose systematically. The pattern is clear: failures rarely stem from a single cause. Instead, they result from compounding errors in preparation, calibration, material handling, and design.
The good news? Most failures are preventable. Understanding the root causes transforms debugging from guesswork into a structured process.
Failed prototypes cost time and money. A prototype that cracks under stress, warps during printing, or separates from the build plate wastes material and delays product iteration. The real cost isn't the plastic, it's the delay in getting your design to market.
Here's what separates successful prints from failed ones: attention to the details before the printer ever starts. This guide walks you through the core failure mechanisms and how to diagnose them.
Build-Plate Adhesion and First-Layer Problems
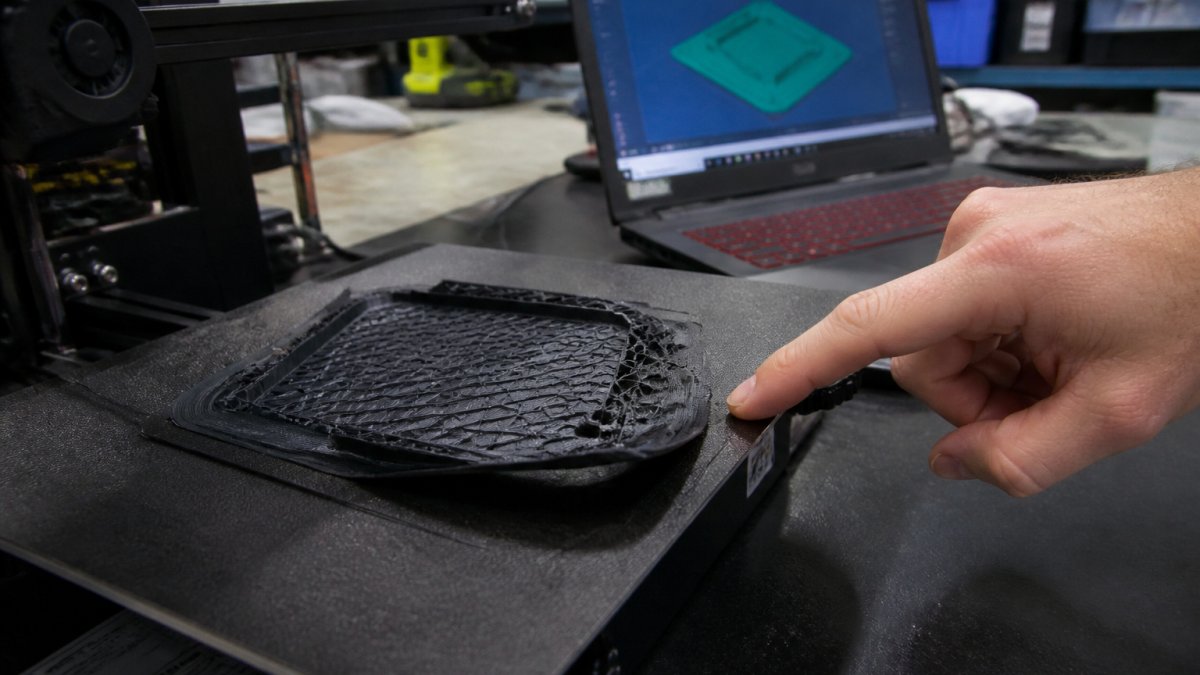
The first layer makes or breaks your print. If your part doesn't stick to the build plate, nothing else matters.
First-layer adhesion failures happen for three reasons:
- Dirty build plate. Dust, residue, or oils prevent the plastic from gripping the surface.
- Incorrect Z-offset. The nozzle sits too high or too low, preventing proper contact.
- Wrong bed temperature. Cold plates don't soften the plastic enough for adhesion.
Start by cleaning your build plate with isopropyl alcohol and a lint-free cloth. Let it dry completely. A clean surface is non-negotiable.
Next, check your Z-offset. The nozzle should be close enough to leave a thin line of plastic on the plate, not so close that it scrapes, not so far that plastic beads up without sticking.
If your bed temperature is too low, the filament won't bond to the plate. Most materials need specific temperature ranges. PLA typically prints at 200-220°C nozzle and 50-60°C bed. ABS needs higher: 230-250°C nozzle and 80-100°C bed.
Check your material's data sheet.
Bed Leveling, Z-Offset, and Calibration Failures
Bed leveling is the foundation of print success. A poorly leveled bed causes adhesion problems, uneven layer heights, and weak parts.
Proper bed leveling means:
- The nozzle sits at the same distance from the plate across all corners and the center
- The gap is tight enough for adhesion but loose enough that plastic flows
- You check leveling every 10-20 prints or after moving the printer
Use a piece of standard paper to gauge the gap. Heat the bed and nozzle to printing temperature first. Paper should slide under the nozzle with slight resistance at all five points (four corners and center). If the nozzle digs in or paper slides too easily, adjust the leveling knobs.
Z-offset calibration goes hand-in-hand with leveling. Even a perfectly level bed fails if your Z-offset is wrong. The offset tells the printer where the plate actually is. Get this wrong, and your nozzle either crashes into the plate or hovers too high.
Many modern printers have automatic bed leveling sensors. These are helpful, but they still need calibration. Don't trust the sensor alone, verify with the paper test.
Extrusion Issues: Over-Extrusion, Under-Extrusion, and Nozzle Problems
Extrusion problems create weak, dimensional, or incomplete parts. Too much plastic (over-extrusion) causes blobs and dimensional errors. Too little (under-extrusion) leaves gaps and weak layer bonds.
Signs of over-extrusion:
- Plastic oozes from the nozzle between moves
- Parts are oversized and have rough surfaces
- Layer lines are thick and uneven
Signs of under-extrusion:
- Gaps appear between extrusion lines
- Parts feel weak and break easily
- The print looks sparse or hollow despite being solid in the file
Over-extrusion usually stems from incorrect flow rate or nozzle temperature that's too high. Under-extrusion comes from nozzle temperature that's too low, a clogged nozzle, or flow rate set too low.
Start by checking your nozzle. A clogged nozzle is one of the most common causes of under-extrusion. Remove the nozzle (with the printer hot) and look for plastic buildup.
Flow rate adjustments happen in your slicer software. Most slicers default to 100%. If your parts are consistently under-extruded, try increasing flow to 105% and print a test piece. If over-extruded, decrease to 95%.
Temperature matters too. Each material has a range. PLA can handle 190-210°C. ABS needs 230-250°C.
PETG works at 220-240°C.
3D Printing Troubleshooting: Temperature, Speed, and Material Condition
Print speed and temperature interact. Fast speeds with low temperatures cause under-extrusion. Slow speeds with high temperatures cause over-extrusion and oozing.
Start with conservative settings:
- Print speed: 40-60 mm/s for prototypes (slower for better quality)
- Nozzle temperature: middle of your material's range
- Bed temperature: manufacturer recommendation
Once you have a successful print, adjust one variable at a time. If quality is poor, slow the print speed by 10 mm/s and try again. If the part is weak, raise nozzle temperature by 5°C.
Material condition is often overlooked. Filament absorbs moisture from the air. Wet filament causes bubbles, weak parts, and surface defects. Store filament in airtight containers with desiccant packets.
If your filament has been exposed to humidity, dry it in an oven at 50°C for 2-4 hours before printing.
Print speed also affects part strength. Faster prints cool quickly, creating microvoids and weak layer bonds. Slower prints allow better layer fusion. For functional prototypes, prioritize strength over speed.
STL File Errors for 3D Printing and Slicer Misconfiguration
Your STL file is the blueprint. Errors in the file cause failed prints before the printer even starts.
Common STL file problems:
- Non-manifold geometry (holes or gaps in the model)
- Thin walls that can't print at your layer height
- Unsupported overhangs that collapse during printing
- Inverted normals (inside-out surfaces)
Before printing, validate your STL file. Use free tools like Meshmixer or Netfabb to check for errors. Most tools can automatically repair common issues.
Slicer settings also determine success. A properly configured slicer converts your STL into machine code (G-code) that the printer understands. Common slicer mistakes include:
- Layer height set too thick, causing weak parts
- Infill set too low, leaving parts hollow and fragile
- Support structure disabled for parts that need it
- Wall thickness too thin for the printer to handle
Layer height depends on your nozzle diameter. A 0.4 mm nozzle typically prints 0.1-0.2 mm layers. Thicker layers print faster but lose detail and strength. Thinner layers take longer but produce stronger, more detailed parts.
Upload your STL file for an instant quote →
Infill density affects strength and print time. 15-20% infill works for non-functional prototypes. Functional parts need 40-60% infill. Structural prototypes may need 80%+ infill.
Support structures are critical for overhangs. If your part has features hanging in space, the printer needs support material underneath. Disable supports only if your part has no overhangs greater than 45 degrees.
A Structured Diagnostic Workflow for Prototype Failures
When a print fails, follow a systematic process to identify the cause.
Step 1: Inspect the failed part. Look at where it failed. Did it separate from the plate? Did it crack mid-print? Did layers delaminate?
Step 2: Check your calibration. Level the bed. Verify Z-offset. Clean the nozzle. Calibration issues cause most failures.
Step 3: Verify material condition. Is your filament dry? Is it the right material for your slicer settings? Wet filament and wrong temperatures account for many failures.
Step 4: Review your STL file. Use a validator tool. Check for non-manifold geometry, thin walls, and unsupported overhangs.
Step 5: Test with a simple part. Print a small cube or calibration part using known-good settings. This tells you if your printer is working correctly.
Step 6: Adjust one variable at a time. If the test part succeeds but your prototype fails, change one setting (temperature, speed, or infill) and print again.
This workflow eliminates guesswork. Each step narrows the possibilities.
3D Print Warping, Deformation, and Design-Induced Failure
Warping happens when parts cool unevenly. The outer layers cool faster than the interior, creating internal stress. As stress builds, parts warp, crack, or deform.
Warping is most common with:
- Large, flat parts
- Materials with high shrinkage (ABS, nylon)
- Thick parts with uneven wall thickness
- Parts printed too fast
Reduce warping by lowering print speed, increasing bed temperature, and using a heated enclosure if your printer has one. For ABS, an enclosure is almost mandatory, the material shrinks significantly as it cools.
Design also matters. Thick walls and uneven geometry concentrate stress. Thin, uniform walls distribute stress more evenly. Sharp corners are stress concentrators; round them when possible.
For functional prototypes, part geometry determines whether it survives real-world use. A prototype that prints successfully but fails under stress has a design problem, not a printer problem. Ensure your wall thickness matches your material's strength requirements.
Contact area with the build plate also affects warping. Small contact areas mean less adhesion and more warping. Design your part with a flat base or add small feet to increase contact area.
3D Printing Material Selection for Prototypes: Strength and Durability
Choosing the right material prevents failures before printing starts.
PLA: Easy to print, low warping, good for visual prototypes. Weak under heat and stress. Best for non-functional prototypes and display pieces.
ABS: Strong, durable, handles heat. High warping, requires heated bed and enclosure. Best for functional prototypes that need strength.
PETG: Middle ground between PLA and ABS. Good strength, moderate warping, easier than ABS.
Nylon: Very strong and flexible. Difficult to print, high warping. Best for parts that need flexibility or extreme durability.
TPU/Flexible materials: Stretchy and durable. Require slow print speeds and specific settings. Best for parts that need to flex or absorb impact.
Choose your material based on function, not just ease of printing.
Promotional items and trade-show displays often use PLA or PETG for visual quality.
Material cost varies by type and volume. Small batches cost more per unit than large runs.
When your 3D printing prototypes fail, the cause is usually preventable. Start with clean equipment, proper calibration, and dry material.
At Alex 3D Print Us LLC, we handle the complexity so you don't have to. From design validation to material selection to print optimization, our team ensures your prototypes succeed. Upload your STL file for an instant quote and let us turn your designs into working parts without the trial and error.
Frequently Asked Questions
What is the most common cause of 3D printing prototypes failing?
Build-plate adhesion failure is the leading cause. When the first layer doesn't stick properly, the print detaches or warps, causing immediate failure. Poor bed leveling, contaminated build plates, and incorrect Z-offset settings are the main culprits. Ensuring your build plate is clean, properly leveled, and at the right height prevents roughly 40% of prototype failures before they start.
Can an STL file cause a 3D print to fail?
Yes. STL file errors for 3D printing include non-manifold geometry, inverted normals, disconnected mesh sections, and insufficient wall thickness. These errors prevent the slicer from generating valid tool paths. Always validate your STL in a repair tool before slicing, and check the preview in your slicer software for obvious gaps or floating sections. Many failures stem from file preparation, not printer settings.
How do you fix warping on a 3D printed prototype?
3D print warping occurs when material cools unevenly and shrinks, pulling away from the build plate. Increase bed temperature to the material's recommended range, reduce print speed for the first few layers, and ensure adequate part geometry support. Adding a brim or raft increases contact area with the plate. For prototypes requiring tight tolerances, consider materials with lower shrinkage rates or redesign the part to distribute stress more evenly.
How do you choose the right material for a 3D printed prototype?
3D printing material selection for prototypes depends on functional requirements. PLA is easy to print but brittle; ABS offers strength but requires higher temperatures and careful cooling; PETG balances ease of printing with durability. Nylon is ideal for load-bearing parts but demands strict environmental control. Evaluate whether your prototype needs to withstand stress testing, environmental exposure, or mechanical assembly. Choosing the wrong material often leads to failure during functional validation, wasting time and resources.